Flowers are a beautiful and wonderful sight to see; everyone has a favorite! Whether it’s daisies or daffodils, or maybe wild sunflowers, there are key tricks and techniques on how to easily paint flowers.
In this quick little guide, I am going to walk you through the science of painting a flower. By the end of this article, which is filled with tips for beginners and experts alike, you’ll be able to capture these natural beauties in a work of art!

Images for Inspiration
At some point or another, I’m sure you’ve wondered how to paint a picture of a flower. With access to the Internet, it’s a very easy task to find a photo reference of a flower to paint.
However, it’s even more fun to find your own flowers and take your own photos. You can pick flowers from your garden, or go to your local florist and pick up some freshly bloomed beauties there.
Once you get your flowers, trim the ends, and then arrange them in a vase to add to your composition. Use an adjustable lamp to add light to the composition and to create areas with distinct shadows and highlights.
Once you get everything set up, time to take some pictures! Make sure they are in focus, and get lots of different angles and a variety of compositions.
Now, with a gallery of wonderful images, you’re ready to rock!
How to Paint Flowers: Best Techniques
I personally prefer to mix mediums when painting, using acrylics for a quick base, and oils for depth, highlights, and small details.
However, if you are strictly an oil painter or acrylic painter, there are several different ways to approach a still life. Below you will find a couple tips on how to paint flowers in different mediums.
Oil Painting
Oil paint is surprisingly a very forgiving medium. If you are going for a realistic painting, I recommend using the traditional process of subtraction.
This process allows you to paint simple flowers step-by-step. Use raw umber as your base color, cover your canvas, and subtract the image in great detail. Elli & DImitra Milan give an in-depth lesson on subtracting in this online course.
Once this layer is dry, glaze your picture with accurate colors. Finally, add your final highlights.
Remember to accentuate the flowers you want to be the focal point, and to fade back the flowers surrounding.
Acrylic Painting
With acrylic paint, you can actually use a similar painting method. If you mix retarder medium with acrylics, it will keep the paint from drying quickly. This gives you time to subtract the paint from the canvas.
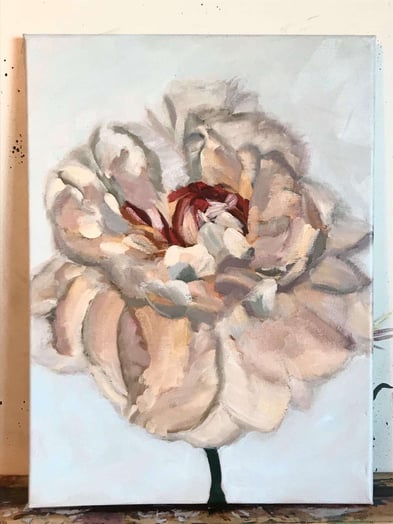
However, I have had the most success using a block-in method. Start with a thin wash over your canvas, and block in the flower going from darks to lights.
Remember to keep your shapes very general in the beginning, and wait to go into more detail later!
Tips for Painting Flowers
Here’s a simple tip to remember as you learn how to paint flowers. Study the shape of the flower or flowers you are painting. Are the petals long and thin? Are there multiple layers? Is the center a disc shape, or a cone shape?
Knowing the basic shape of the flowers - that is circles or cones - makes it easier to accurately replicate their form. It also helps you to decide which brushes you are going to need in order to create certain shapes.
Another great tip would be to make sure your source is clear and visible! If you are painting from life, make sure your flowers and easel are well-lit.
If you are painting from a photograph, make sure it is printed out. Painting from a phone or any other electronic device can cause you to lose some of the depth of the source.
You’ll also want a large variety of colors and brushes out. Even if all your flowers are white, you’ll probably use every color on the rainbow to ever-so-slightly tint the white in the petals.

Keep Your Subjects Fresh
One problem a lot of floral artists have is the short lifespan of their flowers! With a warm lamp shedding light and heat on your flowers for hours and hours as you paint away, you’ll watch your flowers wilt right before your eyes.
This is why it’s important to have a little (or big) photoshoot with your flowers before you begin! If your plants begin to wither, print out your source and finish your painting by looking at photos of your fresh flowers from earlier.

Establish a Focus
An absolute must when you are painting a floral piece, or any still life, is a clear focal point.
To determine your focal point, you must first identify your composition, using a viewfinder. If you don’t have one, you can make one with your fingers. Just form them into a square or rectangular shape and peek through them.
Then, look through your viewfinder, or your fingers, trying out different compositions until you settle on a still life composition that looks balanced and beautiful.
Once you have your composition figured out, decide which of the four focal points you want to accentuate. Go by the rule of thirds for this. Find your focal point, and you’re ready to go.
Find a Suitable Brush
Using the correct brush for the right area of the flower is key when you’re looking for an easy way to paint flowers. When creating larger shapes, use a larger brush.
For soft round edged petals, use a filbert, which has a rounded tip. For sunflower petals, use a larger round brush, as they have a finer point.
Challenge Yourself
It can be very easy for us to always choose the same flowers to paint, or the flowers we think will be the easiest. However, such a practice doesn’t really encourage artistic growth.
If you’re ready to stretch yourself a bit, choose different flowers from time to time. Which flowers grab your attention? Which flowers make your heart sing? Paint those!
Even if they have a hundred and one petals, you’ll be in love with the outcome far more than a flower you painted with absolute ease.
Again, challenging ourselves helps us grow. Without growth, we will never go anywhere we’ve never been.
Avoid Hard Edges
Nature does not have outlines. I repeat; nature does not have outlines! Keep your edges soft.
Here’s a challenge: Try to create a petal with a single brushstroke. You can sketch or lightly paint out a line to mark where you want your petal to go, but avoid going back into the petals afterwards and outlining with any color. This simple but important technique is how you paint realistic flowers.

Avoid Black Paint
One rule when painting all things in nature is to avoid using black. Very rarely, if ever, does black exist in nature. It is always a tone of a color.
For example, the shadows and dark areas in a red rose are usually a bit of red and green mixed together. Those are nature’s compliments!
When you mix two compliments together, you will get a nice natural dark tone. It will also add significantly more interest to your painting if you avoid black, as you’ll have quite a variety of darks all over your piece.
Final Thoughts
A big key to painting anything with excellence is the desire to take the time to do it right, as well as understanding what you’re painting. This guide has walked you through some fundamental basics for painting flowers, but it’s up to you to apply the knowledge, and get excited!
Go take a walk around the neighborhood and snap some sweet shots of your neighbor’s garden. Get out your favorite paints, put on your paint clothes, and get grubby.
Take out ALL your favorite brushes, and line them up all nice and neat, ready to be covered in paint at any moment. Be free! Remember to not be afraid of color, nature is more colorful than you may even realize.
Most importantly, have fun. I would love to see your botanical creations! Use the hashtag #milanartinstitute when you post your floral masterpiece so I can check out your work.
If you'd like to learn more about painting beautiful flowers, consider signing up for our Masters Series, Vol. 1. In it, Milan Art Institute co-founder Dimitra Milan walks you through painting beautiful flowers.
Happy painting!

